Invite customers and prospects with your comp code: 91E49

The Customer Invite Program is a FREE and convenient exhibitor resource proven to drive traffic to your booth and attract valued attendees to your business. This complimentary service provides you with an exclusive comp code and a full set of customized pre-show marketing materials, all in one organized dashboard for a user-friendly experience.

As an additional incentive to participate in this program and invite your customers, the top 3 companies from three separate booth size tiers who generate the most registrations using their comp code will win a gift card with the top winner also receiving the attendee mailing list! The full details of the contest can be found at the bottom of this page.

Scroll down to access invitations customized for Tulip Interfaces and learn more!

Obtain a current list of registrants that have used your company’s comp code to know
who to expect at PACK EXPO East 2022.

Track Your REGISTRATIONS

Watch the video below to learn more about your invitations & marketing tools.

Frequently Asked Questions

Registration is free with your comp code: 91E49. Early Bird attendee registration is $30 through February 25, 2022 and then standard admission is $130.
The invitations are completely free to use.
Share your customized tools with your team by sending them the link to the Invitation Dashboard.

Tulip Interfaces’s link is here: http://nvyt.es/d9681bc0517c8026a308

There is no login required to access the marketing tools, so multiple people can manage your pre-show marketing.

If you would like to add additional contacts to receive outreach reminders, you can add them here: http://nvyt.es/c5dffdcb3831bc64516d
Use the "Click to update logo" option under the logo at the top of this page. Your logo and custom content for emails can be updated through your Nvytes profile, all other information must be updated in your Map Your Show profile and will be updated on your invitations automatically.
The Invitation Dashboard presents all of your pre-show marketing materials in one place. Hover over each icon to learn more about how each option works.

Included in your Invitation Dashboard are email invitation templates, digital web banners, a linked PDF, a customized landing page, various one-click social media posts, and additional resources like the schedule, show logos, and your unique registration link.
Select the "TRACK YOUR LEADS" option under your invitation options to obtain a current list of contacts who registered from your invitations.
Download the customized Email Invitations to invite your customers and prospects to PACK EXPO East.

To send the email templates, please fill out the customized copy and verify your logo.

When you’re finished updating the required information click “Download Customized Email” to continue.


Enter the following information: approximate send date, email list size, and email sending service. Click “Submit Answers” to continue.


Each Email invitation includes two options to access.

Option 1 downloads the HTML Email Invitation as a zip file. Open the zip file to view the HTML file, or save to your computer to access it at a later time.

Option 2 copies the HTML code to your clipboard. If you have your Email Sending service open this allows you to quickly copy and ready to paste the custom HTML code to send to your contacts.

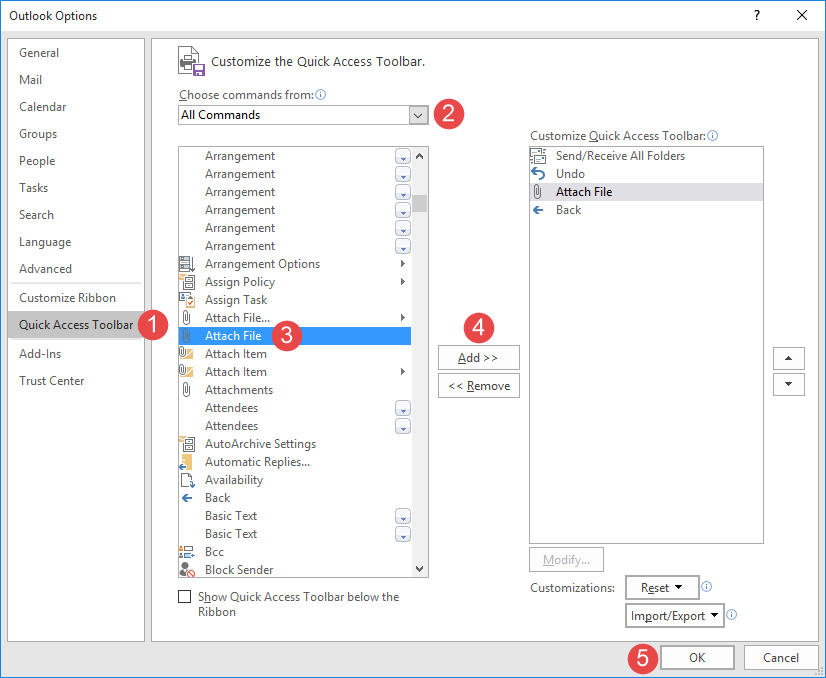
To send your HTML Email Invitation through Outlook, you will first have to add the “Attach File” button to Outlook’s Quick Access Toolbar.


First go to “File” and then “Options” and “Quick Access Toolbar”

Choose “All Commands” from the drop-down menu at the top

Select and highlight “Attach File” to add it to the Quick Access Toolbar. Note that do not select “Attach File…” with the ellipses as this is a different feature.

Add it to the Toolbar with the “Add > >” button and then save it by selecting “Ok”

Once the “Attach File” option is available in the Quick Access Toolbar, you are ready to crate your email.


When you open a new message, click the Quick Access Toolbar and select “Attach File”


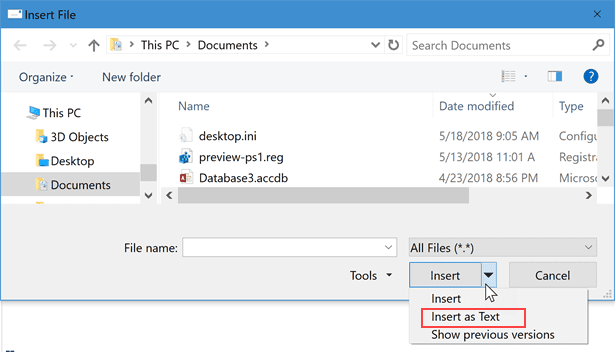
Find the HTML file you would like to use, and from the drop down menu select “Insert as Text”

Your HTML template will generate in the body of the email and you will be ready to send your Email Invitation!
Follow the instructions below to send your Email Invitation through Constant Contact.


Click on “Campaigns” and then “Create”


Select “Email” from the list


Fill out the highlighted information: email name, send date and send time. The email name is only for you to see, it is not the subject line of the email.


Select “Custom Code”


Click to edit the email header


Highlight and delete the text above and paste your custom HTML code into the section.

You can check the “Live Preview” button in the top right corner to see how your email is displaying.

Once everything is displaying as desired, click continue to send to your contacts!

For information on how to schedule and send your emails through constant contact, visit this website.

The easiest way to insert your HTML Email Invitation into Gmail is to copy and paste the content.


After you download the HTML file from the Marketing Email tile, click to open the page. Highlight and copy all the content.


Paste into the body of the email


Your Email Invitation should populate in the body of the email as seen here.

Send a test email to yourself before sending to your contact list to ensure everything is displaying correctly.

Start by selecting either “Single Send” or “Automations” to start building your email.


Select the “Code Editor”


Copy and paste the HTML custom code directly into the content area of the Code Editor. The split-screen view of the Code Editor allows you to see a real-time preview of your email.

Make sure your Emil Invitation is displaying as desired, click “Review Design and Send”

There are three ways to create a custom template by pasting in your own HTML.


Click the "Brand" drop-down and choose Templates.


Select “Create Template”


The quickest way to import the custom HTML code is to “Paste in code”.

There are also options to import an HTML file or Import zip. You can choose which option works best for you.


On the Edit Code tab, replace or edit the example code, and click “Save”


When you are finished editing your email and everything is being displayed as desired, click “Save”

Send the customized Email Invitations to invite your customers and prospects to the show. Four email templates have been created to promote your booth.


To send the email templates, fill out the customized copy and verify your logo.

You can add additional contacts if needed. Your Nvytes account manager will reach out to you regarding uploading your email contact list. Please ensure the email address listed here is the correct contact to coordinate sending the Email Invitation.

When you’re finished updating the required information click “Upload Contact List” to continue.

Read the directions for Email List submission.


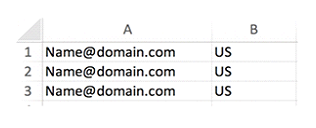
Please only include email address in Column A and associated 2-digital country code in Column B and save your email list in a CSV format.

Once a list is uploaded, it is processed and checked for compliance with GDPR, likely bounce rate, and overall health.


Read the terms and check each box in agreement. Your list will not upload until you have checked these boxes.


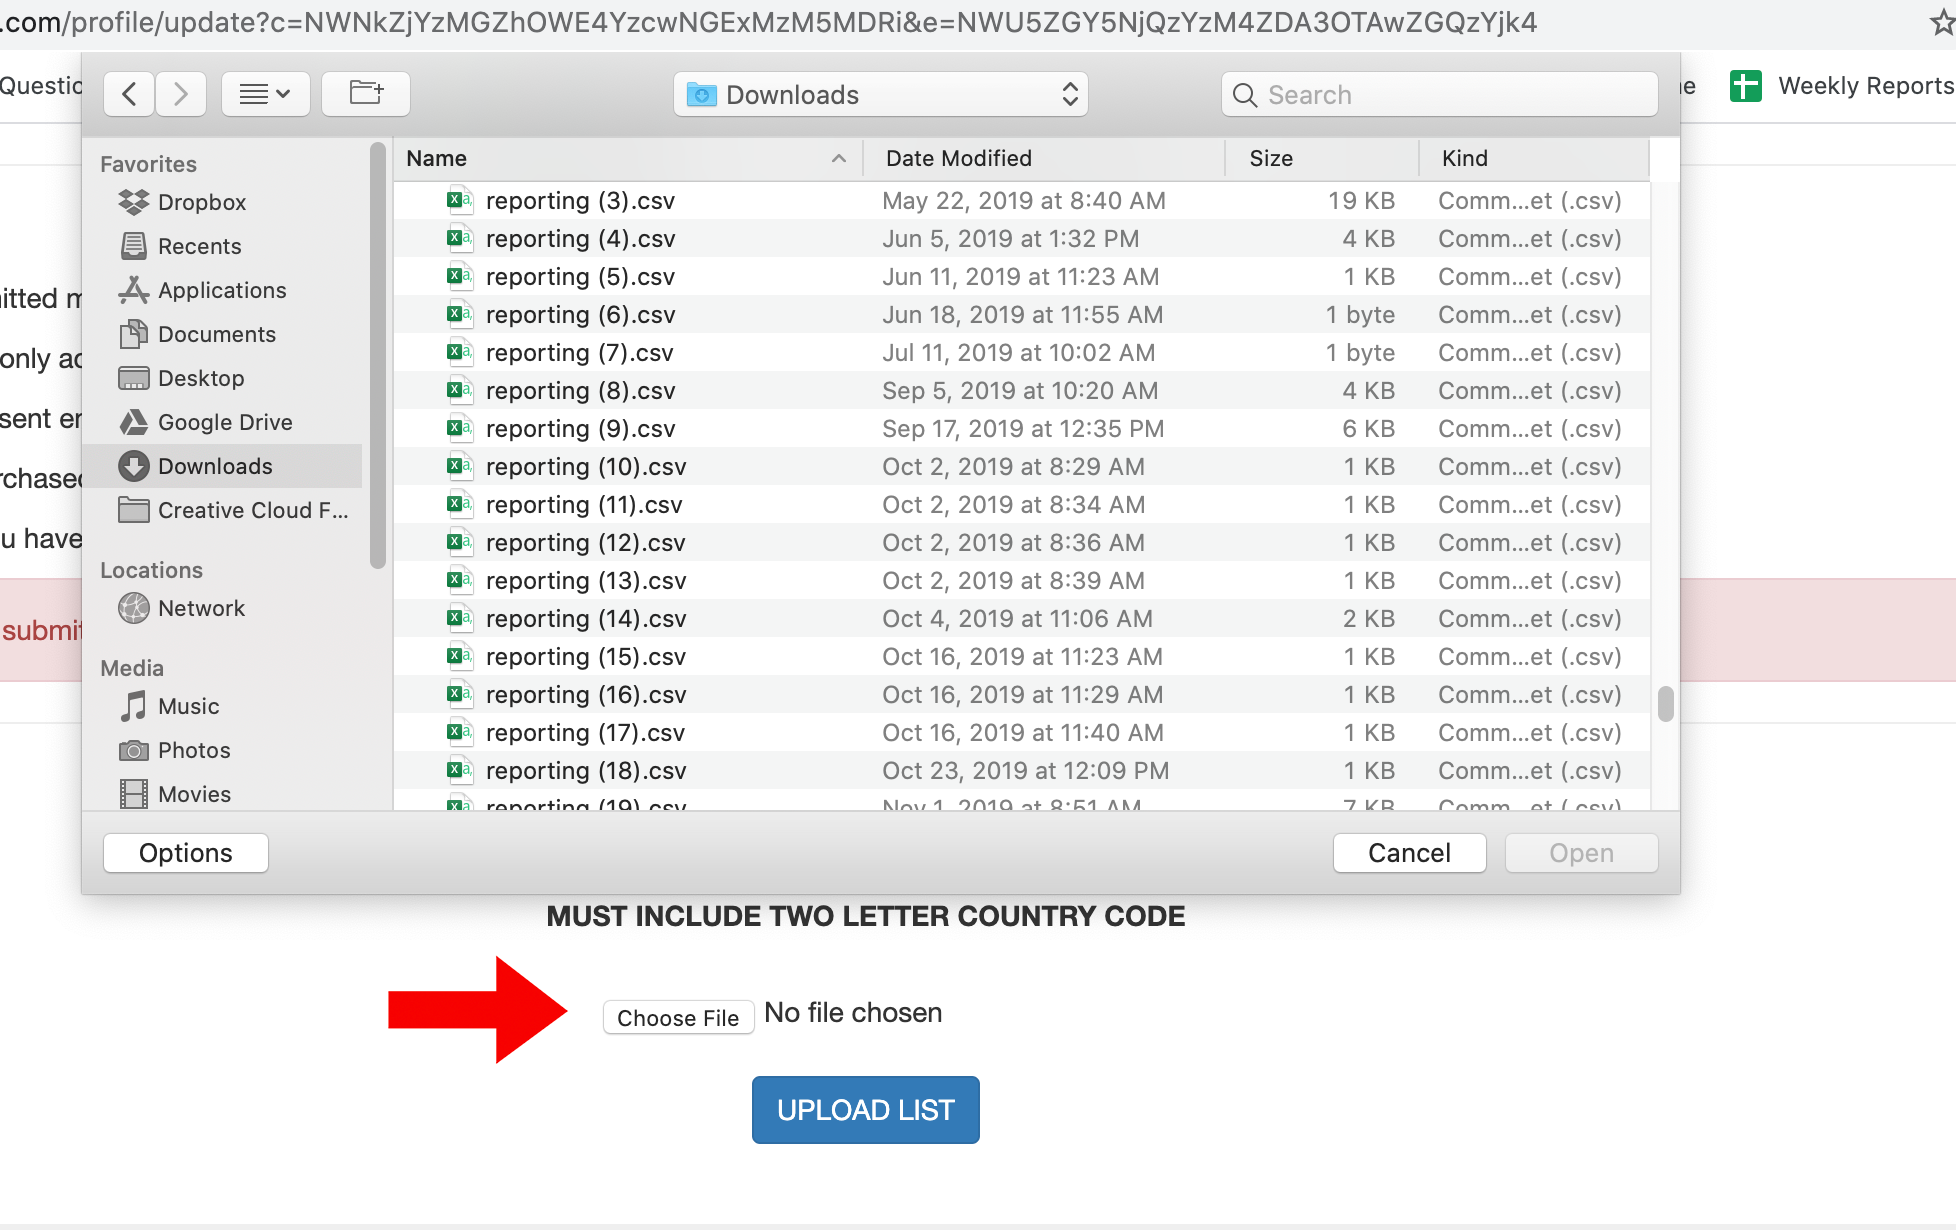
Select the desired Email List and click “Upload List”


The page will refresh and you can scroll down to the updated message. If you see the message “Thank you for uploading your list” you have successfully uploaded the list.

Please give your account manager up to 3 business days to process your list and reach out to you with proofs of the email to schedule deployment dates.

After you upload your email contact list, please give your Account Manager time to check the list for likely bounce rate, compliance with GDPR and overall health of the list.

Once your list is fully processed, your Account Manager will reach out to you with the approval status of your list, the Email Invitation proofs, and ask for email deployment dates. If there are no edits to the Email Invitation, respond to the email with your desired send dates.
There are two ways to use your Digital Web Banners.


Under each banner image, you can click “Download Image” and the image file will automatically save to your downloads. If you use this option, be sure to link the banners to your Landing Page using the link http://nvyt.es/e07734323fb7cb27507c, so your customers and prospects can click on the image to register.

The second option is to copy the HTML code for the link and image. Click the “Copy HTML code to clipboard” button to copy the and paste into your email signature, newsletter, or web pages.


If something isn’t looking right, be sure to refresh the banner with the button to the left of each banner image.

Adding your customized digital banner to your email signature is a great way to begin your pre-show marketing. Follow these steps to add your banner to your Gmail signature and link it to your customized Landing Page so your customers and prospects can easily register for the event with the special offer!


Log into your Gmail account and click on the settings tab.


Scroll down to add a customized signature.


To insert an image, click the Image icon and add the desired image via Google Drive, URL or browsing your files. When you successfully choose an image, it should show in the signature box.


Click and drag to highlight the image, then click the Link button to add your customized Landing Page link.


Insert the link to the highlighted section. Your Landing Page link is here: http://nvyt.es/e07734323fb7cb27507c

Don’t forget to scroll to the bottom to save your changes!

Adding your customized digital banner to your email signature is a great way to begin your pre-show marketing. Follow these steps to add your banner to your Outlook signature and link it to your customized Landing Page so your customers and prospects can easily register for the show with the special offer!


Open Outlook and go to Preferences.


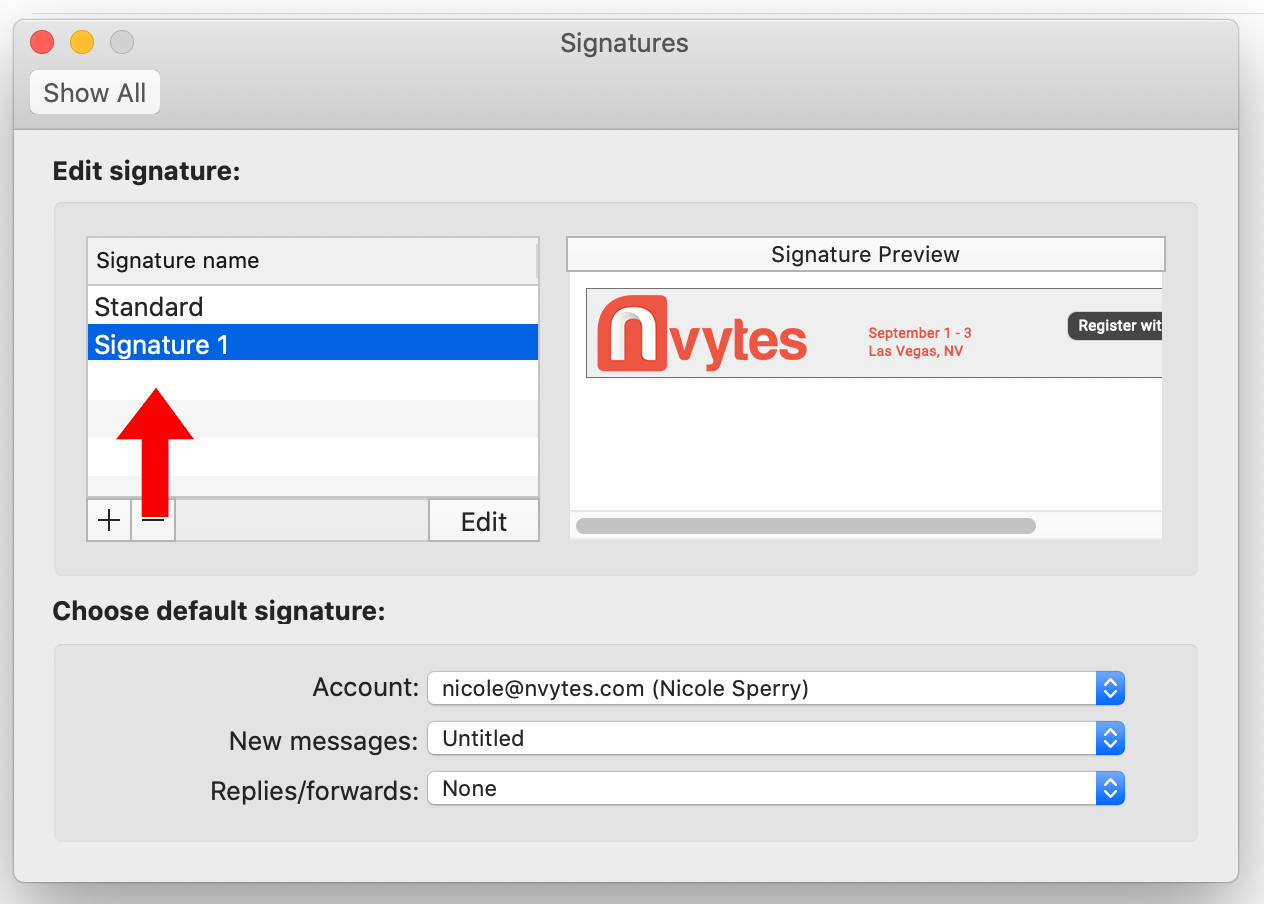
Click on “Signatures”


Click on the “+” sign to add your signature.


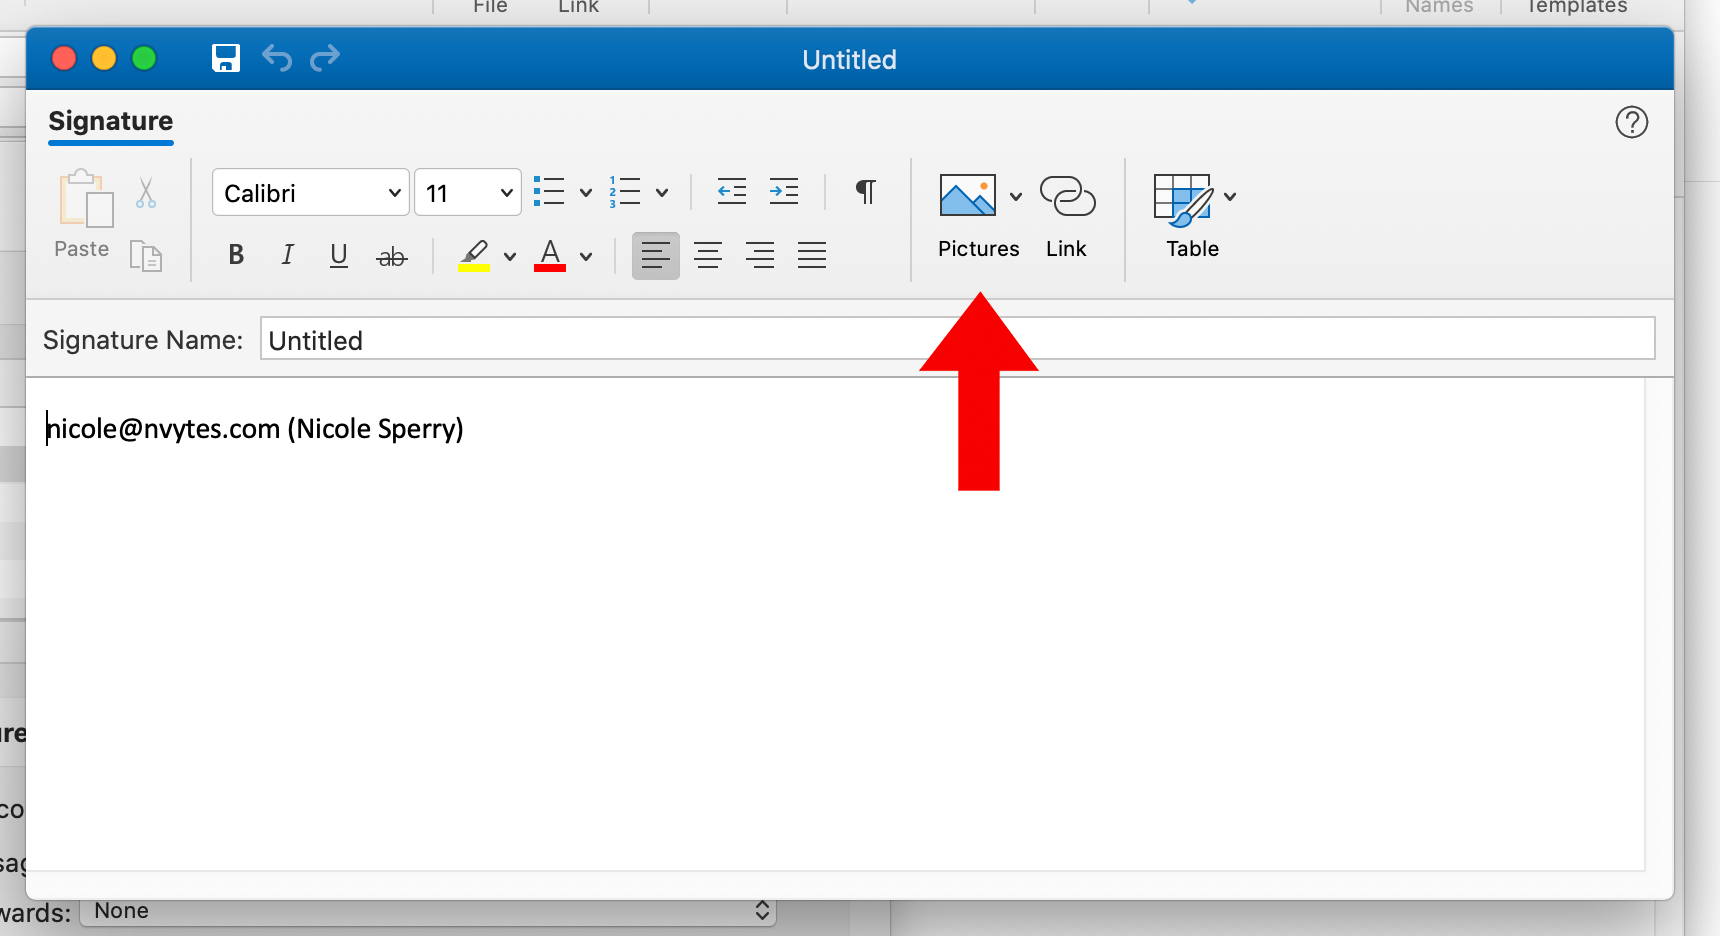
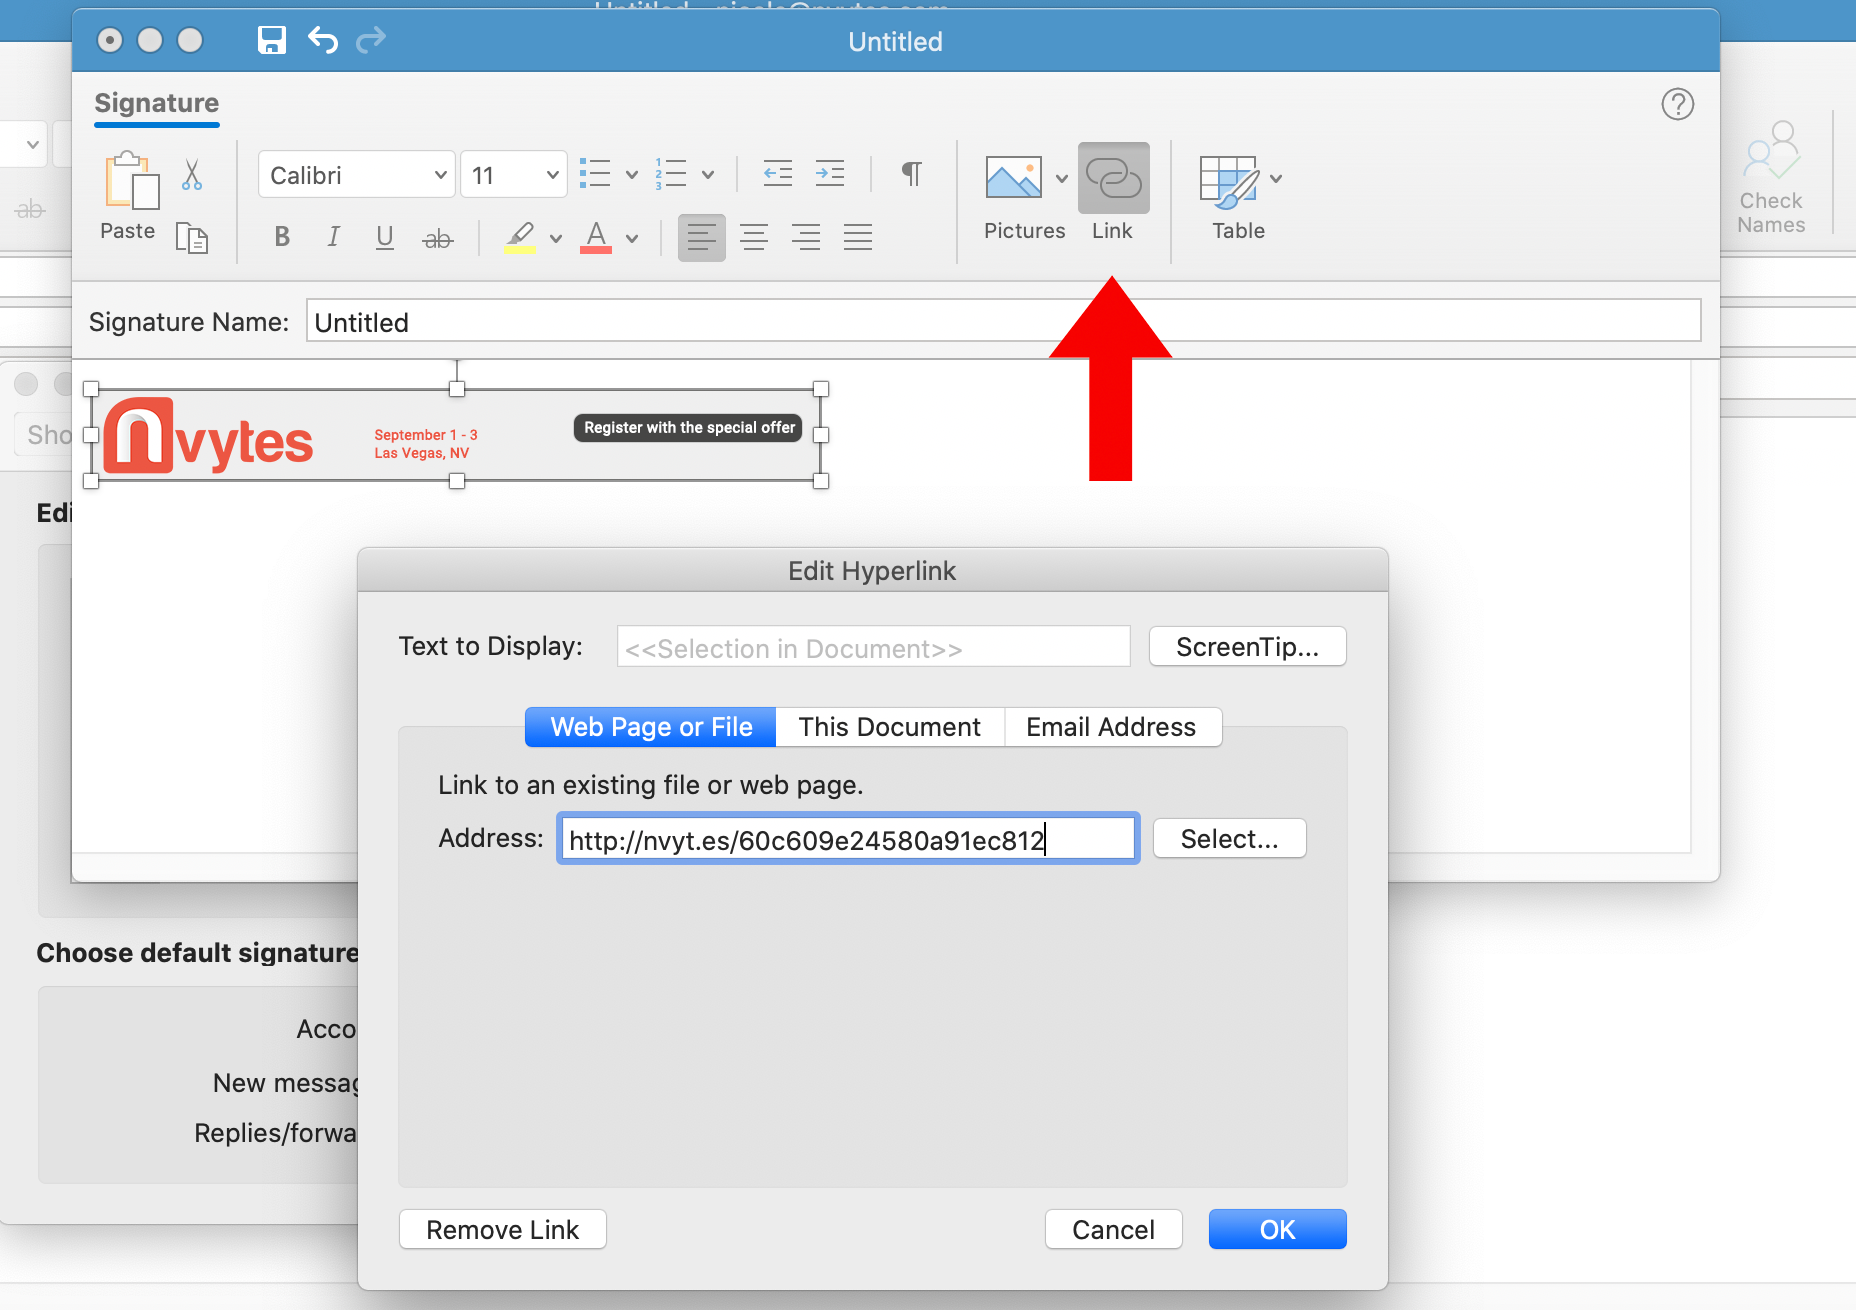
Click on the Picture icon to add the image to your signature.


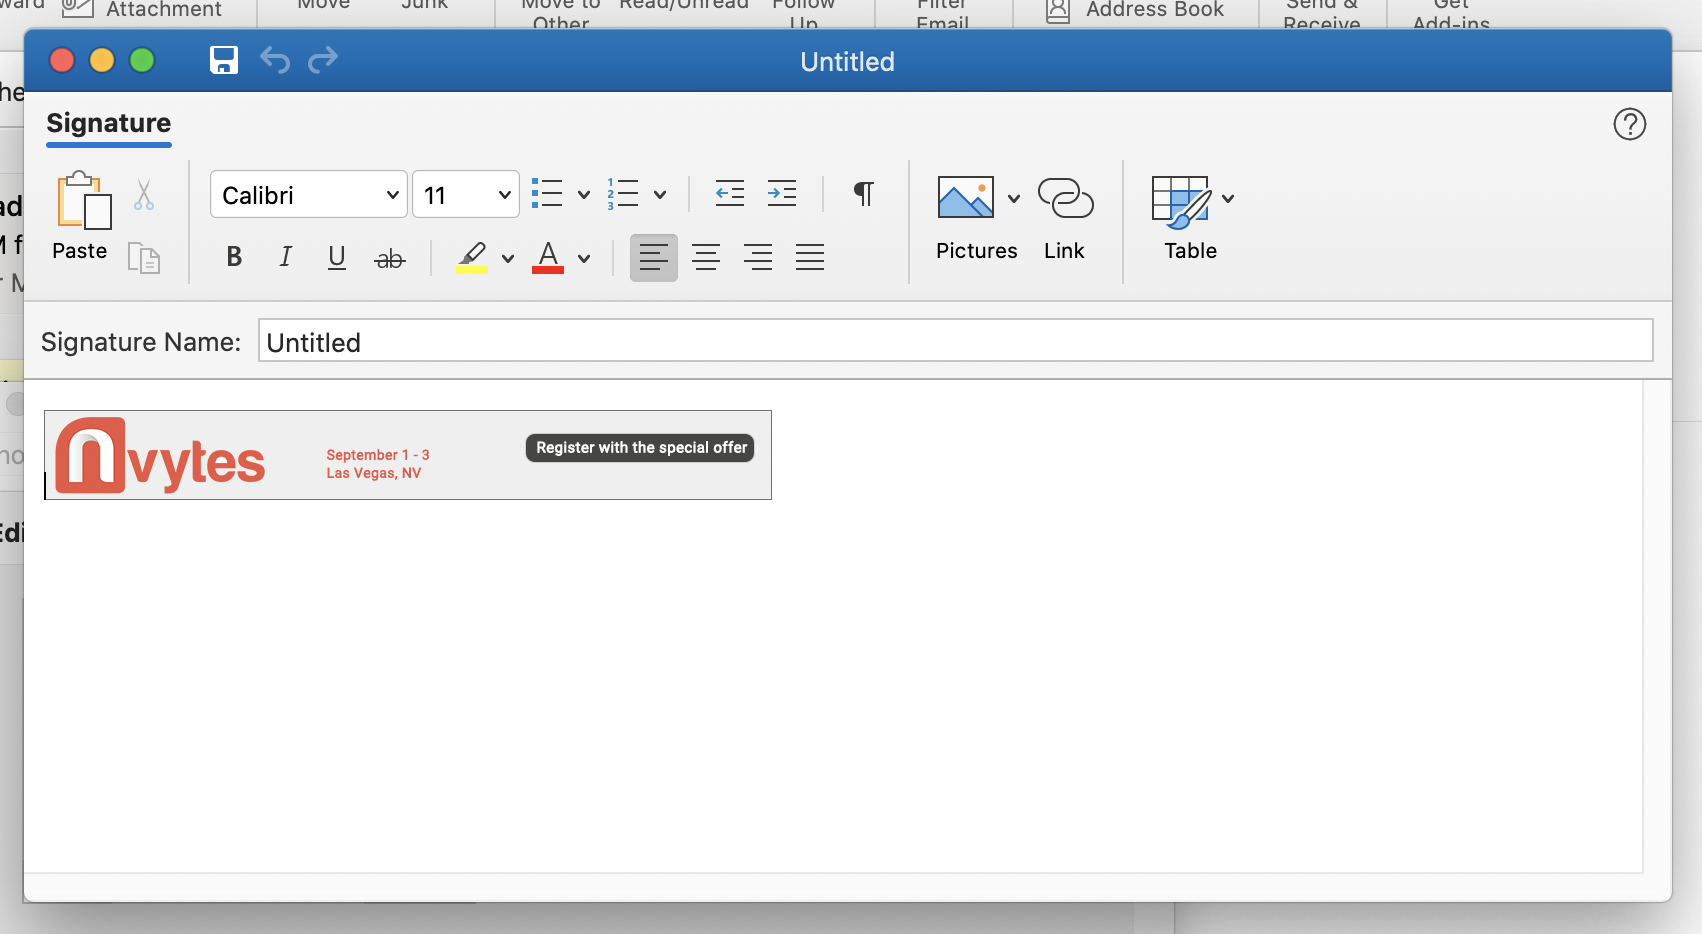
After this step you should see your image in the signature box.


Click on the image in the signature box, then click the “Link” button. A window will appear to paste your Landing Page link into the highlighted section. Your Landing Page link is here: http://nvyt.es/e07734323fb7cb27507c

Be sure to save your signature by clicking the Save button in the top corner.


Highlight the Signature to set it as your preferred signature. Under “Choose default signature:” be sure to select the signature to be displayed on New Messages as well as Replies/forwards.

The PDF Invitation can be downloaded and sent as an email attachment, or linked on your website.

The PDF is linked to your unique registration link.
Your customized Landing Page is a fast and easy way to invite customers and prospects to the event.

On the Landing Page, you will find show information and a registration button so your guests can visit the show for free. You can post your Landing Page link on social media or include it in your marketing emails. If you are using the digital banners in your email signature or web pages, be sure to link the Landing Page so your network can easily find show registration.

The Customer Invitation Program offers one-click posts on LinkedIn, Twitter and Facebook. The posts are customized to Tulip Interfaces and are linked to your customized landing page.

Also provided is an Instagram invitation post with a show-branded image. We include the registration link and caption in the directions for easy copying and pasting into your Instagram bio.
Start your social media pre-show marketing! Each posts feature a show-branded image and copy customized to Tulip Interfaces. The posts are linked to your customized landing page.


One-click social media posts are available for Twitter, LinkedIn and Facebook.


To post on LinkedIn, click the LinkedIn tile on your Invitation Dashboard. A share window will pop up with a preview of the post. Click “Share in a post” to customize your post.


Add additional information to the post and change your audience if you prefer. Once you click “Post” it will be posted on your feed and seen by your connections.


Twitter and Facebook one-click posts work the same way! Simply click the tile, a new share window will open up to customize the social post, then post!
Share the special offer with your company’s LinkedIn followers! To share the post from your company page, you will have to be added as an admin. For more information on how to be added ad an admin, follow the instructions here.


After you’ve posted the special offer with your connections, click the “Share” button to re-post it to your company page.


Go to the drop-down menu to change the profile that you’re posting from.


If you were successfully added as an admin, your organization will show as an option.


If you prefer, add any additional information to the post and change the audience. When you’re finished, click “Post”!


The post will generate on your company page. Your followers can easily register for the event with the special offer!

Market your booth on Instagram! To share the special offer with your followers, follow these easy steps!


Using your mobile device, open the Instagram share option from the Invitation Dashboard.


Tap the Social Share Image on top to download it to your library.


To post on Instagram, open up the app and click the “+” to add a post.


Select the image from your library and paste the caption provided, or create your own! If you create your own caption, be sure to provide your booth number so your guests can meet you at the show.


If you don’t have access to a smartphone, you can still post on Instagram from your desktop.


Go to https://www.instagram.com/ and sign into to your profile.


Right-click anywhere in the white space on page and select “Inspect”


Click the screen icon that’s second to the left. It looks like a tablet and mobile device.


When you click the screen icon, it will highlight blue and the screen should change. If you aren’t seeing the bar along the bottom of the page, refresh your browser.


When the toolbar pops up at the bottom, you can then post on Instagram. Click the “+” sign at the bottom to browse your files for the show-branded image.


Locate the image you would like to upload and click “Open”


You may need to change the sizing. If the image is zoomed in, click the button with arrows on the bottom left to zoom out, then click “Next”


Add your caption and click “Share” to publish the post.


Check back on your post to make sure it was successfully posted!

Further Questions?

For assistance with the Customer Invite Program reach out to:

Email: PackExpo@Nvytes.com or call (949) 545-8839

Hours: 8:00am – 5:00pm PDT
Monday – Friday

*Non-exhibiting supplier (NES)/Distributor registrants are limited to 10 complimentary registrations per attending company. Non-exhibiting suppliers and distributors wishing to register more than 10 employees from their company will be subject to standard attendance fees.

Win up to $150 for Participating in the Customer Invite Program!

Be among the top three companies in each booth size tier to generate the most registrations from your comp code and get rewarded - simply by inviting your customers using this free resource.

1st Place: $150 gift card + attendee mailing list

2nd Place: $100 gift card

3rd Place: $50 gift card

Tier 1: Booths 601 sq.ft. and larger

Tier 2: Booths 301 sq.ft. – 600 sq.ft.

Tier 3: Booths up to 300 sq.ft.